Clam AntiVirus(ClamAV)是免费而且开放源代码的防毒软件,软件与病毒码的更新皆由社群免费发布。目前ClamAV主要是使用在由Linux、FreeBSD等Unix-like系统架设的邮件服务器上,提供电子邮件的病毒扫描服务。
安装
添加epel源。
yum install epel-release安装
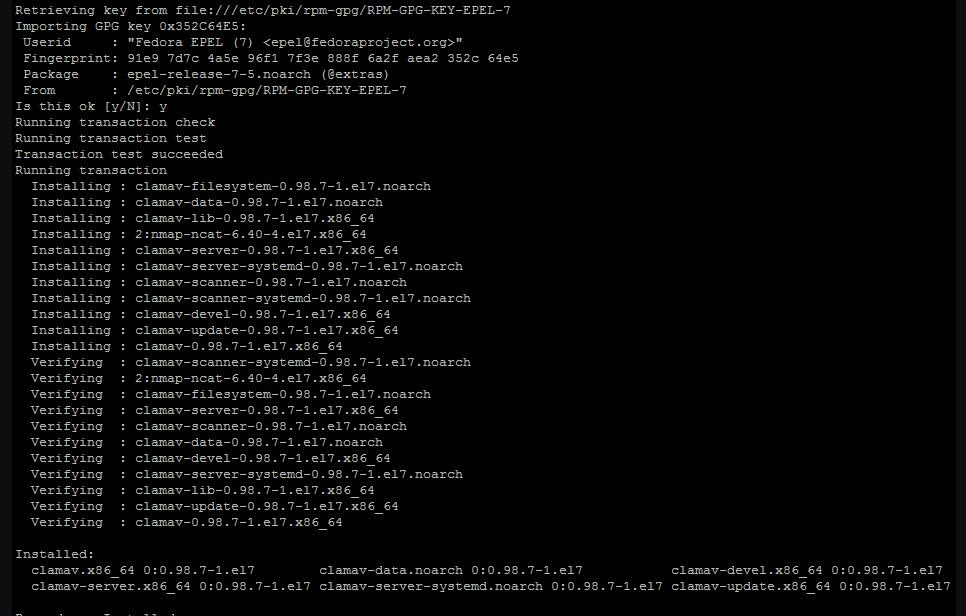
yum install clamav-server clamav-data clamav-update clamav-filesystem clamav clamav-scanner-systemd clamav-devel clamav-lib clamav-server-systemd安装成功类似如下:

配置SELinux
如果centos 7系统没有开启SELinux,直接略过就可以。
关闭SELinux步骤:http://blog.nbqykj.cn/?p=2851.html
命令:
setsebool -P antivirus_can_scan_system 1
如果没有运行上面那个命令,运行freshclam可能就会出现这个错误。
During database load : LibClamAV Warning: RWX mapping denied: Can't allocate RWX Memory: Permission denied配置clamav
配置文件clamd.conf 。
cp /usr/share/clamav/template/clamd.conf /etc/clamd.d/clamd.conf
sed -i '/^Example/d' /etc/clamd.d/clamd.conf
修改/etc/clamd.d/clamd.conf文件,如果没有clamav用户就新建一个。
User clamav
LocalSocket /var/run/clamd/clamd.sock
开启Freshclam
cp /etc/freshclam.conf /etc/freshclam.conf.bak
sed -i '/^Example/d' /etc/freshclam.conf
配置systemd服务
创建/usr/lib/systemd/system/clam-freshclam.service,内容如下:
# Run the freshclam as daemon
[Unit]
Description = freshclam scanner
After = network.target

[Service]
Type = forking
ExecStart = /usr/bin/freshclam -d -c 4
Restart = on-failure
PrivateTmp = true

[Install]
WantedBy=multi-user.target
启动
systemctl enable clam-freshclam.service
systemctl start clam-freshclam.service
查看状态
[root@centos7 system]# systemctl status clam-freshclam.service
clam-freshclam.service - freshclam scanner
Loaded: loaded (/usr/lib/systemd/system/clam-freshclam.service; enabled)
Active: active (running) since Thu 2015-06-11 11:09:24 CEST; 1s ago
Process: 3158 ExecStart=/usr/bin/freshclam -d -c 4 (code=exited, status=0/SUCCESS)
Main PID: 3159 (freshclam)
CGroup: /system.slice/clam-freshclam.service
└─3159 /usr/bin/freshclam -d -c 4
clamav主程序服务开启
默认systemd服务类似如下
[root@centos7 system]# ls -l /usr/lib/systemd/system/clam*
-rw-r--r--. 1 root root 136 Apr 29 20:38 /usr/lib/systemd/system/clamd@scan.service
-rw-r--r--. 1 root root 231 Apr 29 20:38 /usr/lib/systemd/system/clamd@.service
修改
mv /usr/lib/systemd/system/clamd@.service /usr/lib/systemd/system/clamd.service
vi /usr/lib/systemd/system/clamd@scan.service
# 去除.include /lib/systemd/system/clamd@.service 的@符号
修改/usr/lib/systemd/system/clamd.service文件类似如下。
[Unit]
Description = clamd scanner daemon
After = syslog.target nss-lookup.target network.target

[Service]
Type = simple
ExecStart = /usr/sbin/clamd -c /etc/clamd.d/clamd.conf --foreground=yes
Restart = on-failure
PrivateTmp = true

[Install]
WantedBy=multi-user.target
启动
[root@centos7 system]# systemctl enable clamd.service
[root@centos7 system]# systemctl enable clamd@scan.service
[root@centos7 system]# systemctl start clamd.service
[root@centos7 system]# systemctl start clamd@scan.service
clamav正常就安装完成,接下来可以使用clamav了。例如clamav结合postfix邮件系统。
参考链接:https://linux-audit.com/install-clamav-on-centos-7-using-freshclam/
正文完
微信搜一搜“奇悦电脑科技”或扫描二维码关注我们


